Git is a popular version control tool used by developers all over the world. Created by Linus Torvalds in 2005, it plays a huge role in coordinating work between different developers on a project. While most developers are familiar with using Git, here I’ve compiled some of the tips and tricks with Git that has made me more productive over the years.
Git aliases
Git aliases are shortcuts you can use instead of long commands that you have to type out frequently. These aliases are stored in the git config file and can be created with local or global scope.
Let’s say we want to create an alias co for the git checkout command. For this, we use the git config command
$git config --global alias.co checkout
Similarly for mapping br to branch command,
$ git config --global alias.br "branch"
Other examples
For cob to checkout -b
$ git config --global alias.cob "checkout -b"
For rh to reset HEAD
$ git config --global alias.rh "reset HEAD"
Git stash
GIt stash is a function that comes handy when you want to save something you’re working on, but you’re not ready for a commit just yet. For example if you’re working on something and you have to switch to something else before the first one is not fully done. The git stash command saves the changes you’ve made on your working copy temporarily.
To save a stash, let’s say, named example_stash
git stash save "example_stash"
All of your stashes will be stored in a “stash stack”
To view all of your stashes
git stash list
To apply your stash, AND remove it from the stash stack, you pop the stash
git stash pop stash@{n}
To apply your stash and keep it in the stash stack, you use the apply
git stash apply stash@{n}
Here, n is the index number of the specific stash in the stash list.
To see the files that changed in the recent stash
git stash show
Make it git stash show -p and you can see the diff
To delete a specific stash,
stash drop <stash-name>
Git tags
Tagging is used to mark specific points in the history of a repository, usually a release.
There are two types of tags, lightweight and annotated. Lightweight tags are like a branch that doesn’t change, its just a pointer to a specific commit.
$ git tag v1.1
An annotated tag contains additional information, and are stored as full objects in git database. They contain the name, email ID of the tagger, and a tagging message.
$ git tag -a v1.0 -m 'Version 1.0’
Git cherry-pick
Git cherry-pick is used to pick a commit from one branch and apply it to another. It’s useful if you want to pick specific changes you have made on a different branch but are not yet merged to your default branch (say, staging or master).$ git cherry-pick
7300a6130d9447e18a931e898b64eefedea19544
Git Submodule
Git submodules are great when you want to clone one project within another, but want to keep the two projects separate.
This command comes useful when you want to add a specific repository to a specific path.
$ git submodule add <remote_repository> <path/to/submodule>
When you want to update (clone missing submodules, and checkout the commit specified by the super-repo) registered submodules, this command is useful
$ git submodule update [—init]
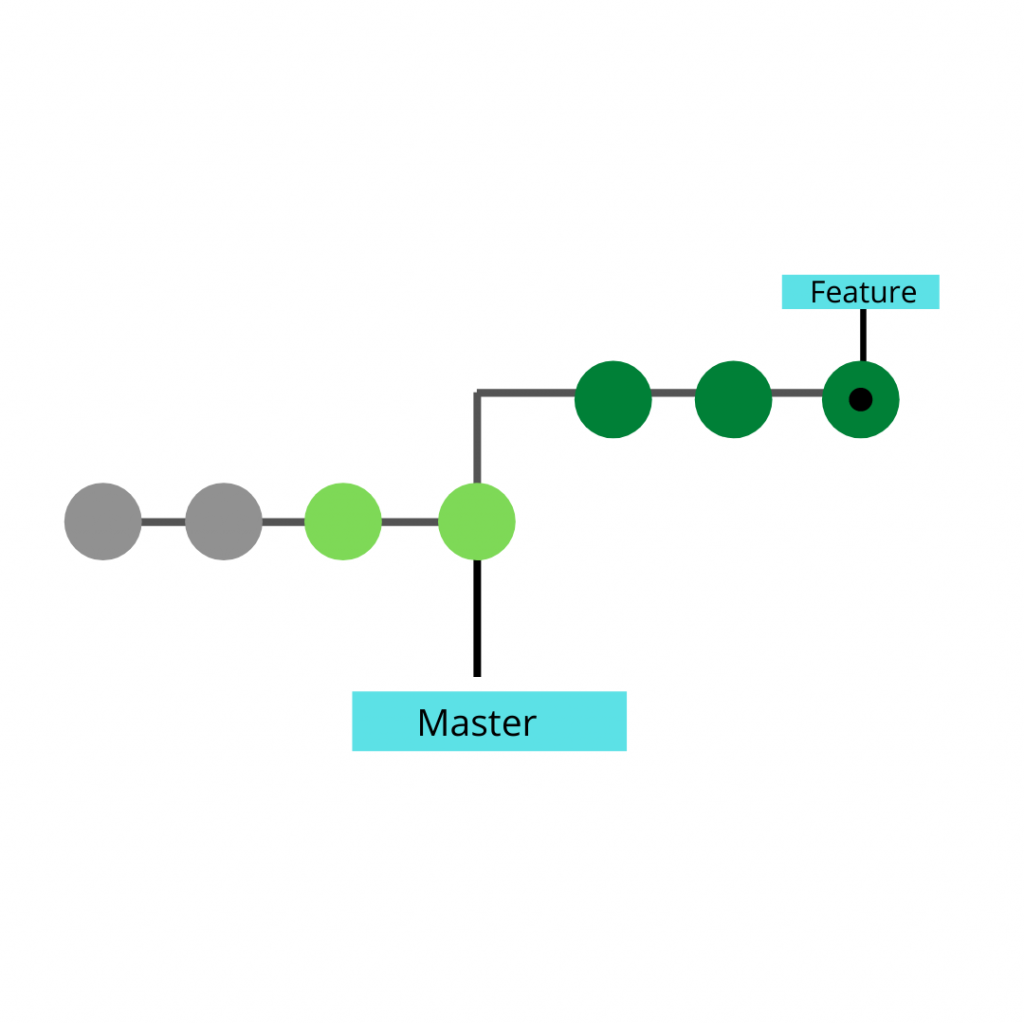
Git Rebase or Git Merge
These two are used to integrate changes from one branch to another.
Rebase lets you apply all the commits of one branch (Let’s say feature) on top of commits from another branch (Master branch). If there are any conflicts between the commits on two branches, git will provide a message. Generally, before running the rebase command, the branch is checkout. Note that, rebase will rewrite history.

$ git checkout feature
$ git rebase master
With Git Merge, you can integrate contents from one branch (master) to another branch (feature). Here the source branch (master) remains the same. In merge, the history and chronological order is preserved
$ git checkout feature
$ git merge master
Git revert
Git revert is useful if you feel like you accidentally made a commit, or if you notice a bug which was caused by a single commit. Revert undoes a commit by creating a new commit. Unlike reset, revert doesn’t remove all the previous commits. This is great since it doesn’t change project history, and it can be applied at any point in history.
Fixing mistakes
If you want to abandon everything since your last commit, use
$ git reset --hard
If merging results in conflicts, and you just want to forget about it, this command will be useful. But it can also be dangerous, so be careful while using it. Reset hard will actually change your files to match the commit you reset to.
Let’s say you forgot something on your last commit. Use this command
$ git reset --soft HEAD^
It will undo the last commit, but keep all the changes in staging area.
Golden rules while using Git
– Don’t change published history
– Always work on branches / branch per feature
– Write useful commit messages
– Update often from remote origin
– Don’t use Git GUIs extensively